Cape Cod Bathroom Design & Usability Idea- Shower Base Options

Showering Spaces..The MVP of the Bathroom. Most folks love a good long hot shower. It's also a great place to relax and do some productive thinking.

When it comes to building a new shower space, options are plentiful and be warned- Showers are usually the most expensive space within a bathroom. Many custom shower spaces run well over $6K and we done some in the double digit range.  This is because a considerable amount of work and materials go into constructing a durable and leak proof showering space.

Below I have detailed the various options that are available as well as the pro and con of each type of base.

Stock Shower Base This refers to a type of shower base that is readily available and installs quickly.

Cape Cod ShowerCast Iron. There is as of this post, only one company that makes cast iron shower bases. (Kohler) and they have only 5 sizes/styles to choose from. All single threshold.  However, I personally believe that a cast iron shower base is the way to go in shower bases. The durability and ease of cleaning of cast iron makes it a worthwhile investment.

Up: Built like a tank. Easy to clean. Will last more then a lifetime.

Down: Heavy and challenging to install. Very limited options in size and  curb placement.

It's on my wish list for Kohler to create a cast iron shower base measuring 48x36 0r 60x36 with a double curb.  This would allow for a corner shower with a glass wall which would be fabulous in many of the undersized bathrooms that we remodel.

Cast iron bases are usually used in tandem with tile walls.

Composite Shower Pan in Cape Cod
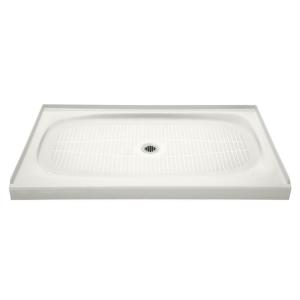
Composite. Typically these are shower bases fabricated from acrylic or fiberglass.

Up: Available in many sizes, shapes and colors.  Most are durable and easy to clean. Installation is a breeze. Most cost effective way to create a custom shower.

Down: Can easily be damaged by a dropped tool, susceptible to scratches. Can feel spongy unless embedded in structural mortar.  (We typically set our bases in mortar.)

Composite bases can be used with tile or with color matched surrounds.

Custom Shower Base This refers to a type of shower base that built on site and fully customizable.

Metal Pan. Many custom shower bases are constructed using a metal pan fabricated from sheets of copper. This method allows for a base of just about any size. Typically the metal pan is made by folding up all sides of a sheet about 4-6 inches and then soldering any joints to create a water tight base.  The base sits directly on the sub floor and cement is poured inside the pan to create a sloped plane from all sides towards the drain. The tile is usually set over this cement base.

In addition to the pan, a curb must be made on the outer perimeter of the pan. Poured concrete or bricks usually make up the curb which is covered with tile and/or stone.

Up: Can be customized to fit any space. Built like a tank.  Some methods of construction will allow for a trench drain and larger tiles sloped in one direction.

Down: Labor and material intensive. Can be expensive.  Copper can corrode from chemicals in modern soaps and shampoos.

TBT Custom Tile Shower Base 1 50
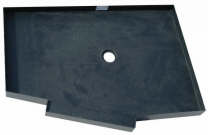
Composite Pan. We have used composite pans when we have needed a custom size or a double curb. Made to our specs with drain placement where needed, this is a proven and successful method of creating a tileable shower base. We order them from showerbase.com and they are shipped pre-sloped with the curb built right in. We can set it in place with a layer of thinset, set up the walls with cement board and water proofing and then start tiling.

Up: Customizable for any space. Saves labor, time and money.  Will last a lifetime. Stock sizes immediately available.

Down: Lead time is about 2-3 weeks for custom sizes.

Recommendations

For a durable easy to clean shower base, I would recommend cast iron if the sizing works.

If your need a standard size and a base that is easy to clean, a stock composite base will be just the ticket.

For a fully custom base covered with tile, a composite pan is the way to go.

Better Bathroom Storage

Orginally posted on FineHomeBuilding.comby Jamie Goldberg

The house I grew up in had only one full bathroom, which my parents, sister, brother, and I shared. Somehow, we made it work, as do millions of families today. But almost any bathroom will work better if a little more storage is added to the mix. The best time to maximize a bathroom’s storage capacity is, of course, at the design stage, but you can explore plenty of storage-boosting options while remodeling or simply when updating fixtures and cabinetry.

Whether incorporated into the original design or added after the fact, bathroom-storage expansion its into three categories: (1) increasing the capacity of traditional storage areas like vanity cabinets; (2) maximizing existing floor and wall space with new storage options; and (3) identifying storage possibilities in spaces that are not traditionally used for storage. These approaches are outlined on the next page, and strategies from all three are used in the illustrated examples.

The Full-Function Vanity

Full Function Vanity in Cape Cod RemodelingIt’s not uncommon even for large vanity units to fall short on functional storage. In this example, the space between the sinks is wider than 30 in., allowing a stacked 24-in.-wide butt-door cabinet pair. The double doors and lack of a center stile allow access from both sides. The lower unit is backless and contains a wall outlet, making it useful for housing and charging electric shavers and electric toothbrushes. The 12-in.-deep space above houses daily-use items that are too large for the medicine cabinets.

False panels in the sink bases have been converted to tilt-out trays for toothpaste and dental-floss storage. Doors are equipped with storage racks, including one for hair dryers. If extra storage is needed, U-shaped shelves can double the capacity of the sink cabinets. The center drawer’s functionality is increased with a tiered divider, while the basic linen tower has been made more useful with a quartet of roll-out trays in the lower section.

The Compact Bath

Compact Bath in Cape Cod RemodelingThis typical, small master bath offers occupants two sinks and a shared drawer bank but not much more in the way of storage. National Kitchen & Bath Association design guidelines recommend 30 in. of clearance (or a minimum of 21 in.) in front of the vanity and toilet, eliminating the opportunity for floor storage on the opposite wall. However, a 12-in.-deep shelf runs the length of the wall above the entry door to hold occasional-use items. The shelf can be supported by L-brackets or decorative supports, as long as they don’t interfere with the door swing below. Taking advantage of otherwise unusable space behind the in-swing door is a tall, shallow cabinet installed between the wall studs. It holds occasional-use items that might otherwise be stored in a recessed medicine cabinet, freeing that valuable point-of-use space for daily needs. An 8-in.-deep cabinet above and within reach of the toilet offers point-of-use storage for spare rolls of tissue and other items.

The Maximized Master Bath

Master Bathroom Remodeling in Cape Cod MAThis remodeled bath maximizes daily point-of-use space in all three functional areas: tub, vanity, and toilet. The water closet features a floor cabinet for backup toilet paper, a toilet brush, and toilet-cleaning supplies. The wall cabinets above the toilet, only 8 in. deep to avoid collisions, hold supplies within reach of the user. Occasional-use items for the water closet can be stored in the upper section. The shower includes double niches to hold each occupant’s bathing necessities. One is within 15 in. of the shower bench for easy reach. The tub deck is extended with storage in front for towels and other bath essentials. The deeper deck also facilitates a safer sit-and-swivel entry. In the vanity area, the linen tower offers space for a roll-out hamper in the bottom section. The opposite vanity takes advantage of an extrawide countertop to offer additional storage above for small electric devices with access to an outlet. Each wall cabinet is only 12 in. deep to allow counter space in front. Three ways to boost bathroom storage

1. Increase the capacityof traditional areas • Add two-tiered organizers to any 4-in. or taller vanity drawer boxes, thus creating extra half-drawers without altering the existing cabinet. • Install a storage rack on the back of every vanity base-cabinet door. Special racks are available for space-hogging hair dryers. • Add roll-out trays to the bottom of base cabinets, and use them in place of shelves in linen towers, making what’s stored in the back more visible and accessible. • Wrap a U-shaped shelf around undersink plumbing to add an extra level of storage. • Convert the false panel below a vanity countertop to a tilt-out tray.

2. Maximize existing floor, surface, and wall space • Maximize point-of-use vanity storage with countertop cabinetry. Use 12-in.-deep cabinets, keeping them at least 3 in. from the sink edge to prevent water damage. The cabinets can extend to the ceiling with a decorative crown molding, or stop a foot lower if there’s a vent or light above. Regardless of height, they should be finished with a topcoat that protects against moisture, and be kept as dry as possible to prevent moisture damage at the point of contact with the vanity top. • Increase point-of-use commode storage. If it is not situated under a window, install a single or stacked cabinet to the ceiling above the toilet. It should be low enough for a seated user to reach inside and extend no farther out than the toilet tank to avoid causing injury. • If there is a window directly above the toilet, space might still exist for a shorter cabinet or shelf to be installed between the window and the ceiling for backup supplies. Ensure that the bottom is finished because it will be highly visible. • Take advantage of unused floor space to create a built-in furniture armoire, floor cabinet, or storage bench for backup and occasional-use items. Remember to allow for clearances when adding storage of this type. National Kitchen & Bath Association design guidelines recommend 30 in. in front of a vanity, commode, or shower. NKBA guidelines are often more stringent than building codes, but be sure to check local requirements to ensure that you’re in compliance whenever undertaking a bathroom project.

3. Identify storage possibilities in nontraditional spaces • Add a finished shelf above the bathroom entry door to take advantage of otherwise unused space for occasional-use items. Whenever possible, run it wall to wall. • Take advantage of the forgotten space behind an in-swing door by building a tall, shallow cabinet into the wall between studs. • Create a shower-wall niche for each bathroom occupant to accommodate daily point-of-use bathing items. At least one should be built within 15 in. of the shower bench for seated access. • Plan open-storage cubbies for towels or bath supplies on the front end or exposed side of a new tub deck. • Plan built-in, open wall-shelving units at one or both ends of a tub-only enclosure for daily point-of-use bathing items in storage baskets.

Drawings: Martha Garstang Hill

From Fine Homebuilding217 , pp. 88-92 January 20, 2011 © 2012 The Taunton Press, Inc. More good stuff from Fine Homebuilding here.

Bathroom Layouts That Work - By Scott Gibson

gi025-00_ldA bathroom remodel can range from something as simple as upgrading a vanity or replacing a toilet to a complete overhaul, which includes the relocation of plumbing and electrical lines or even enlarging the room. Layout is a key consideration, not only because it has a major impact on what the remodeled space will be like, but also because it affects the overall scope and cost of the project. Creating a large bathroom opens the door to a number of design options, including the addition of a large soaking tub or walk-in shower that wouldn't be possible in a smaller space. It's one argument in favor of expanding an existing bathroom into an adjacent bedroom or closet.Creating a large bathroom opens the door to a number of design options, including the addition of a large soaking tub or walk-in shower that wouldn't be possible in a smaller space. It's one argument in favor of expanding an existing bathroom into an adjacent bedroom or closet.

There’s no better place to start than with the bathroom you already have. Its shortcomings as well as the features you’d like to preserve can be a guide to what you want in a new bathroom. You might be lacking storage for linens, feel cramped when there’s more than one person at the sink, or find there’s not enough room around the tub to towel off comfortably after a bath. On the other hand you might want to keep the vanity sink for storage or the tub/shower unit because you have three young kids. Whether you work with a design professional or devise your own room layout, a detailed scale drawing will help you spot problems and envision design solutions.

The second step is to make a list of your priorities. Each major fixture comes with its own set of requirements—for plumbing and wiring as well as how much floor space it should have. What’s at the top of your list? A whirlpool tub big enough for two? An oversize walk-in shower? A separate enclosure for the toilet or an enlarged vanity with two sinks? You may not be able to get everything, so rank your wish list to help make final decisions easier.

Planning on Paper

Drawing a new bathroom on an existing floor plan can help you visualize new possibilities. This existing 6-ft. by 9-ft. bathroom is in a mid-1970s Cape Cod. It includes a fiberglass tub/shower unit, a single-sink vanity, and a toilet. By moving one interior wall about a foot and shifting fixtures around, a much more pleasing bathroom is possible, as evidenced in the after floor plan.

The window and toilet locations stay the same to help minimize construction costs and allow other amenities: an oversized shower that takes the place of the tub unit, a double-sink vanity, body sprays in the shower, new lighting, and a radiant floor heating mat.

What does the plan give up? Not much. A small hall closet was eliminated and some plumbing changes were made, but they were relatively minor and not nearly as expensive as moving the toilet would have been.

Bathroom-Layouts-gi023-01_med               Bathroom-Layouts-gi023-02_med


Important Considerations

gi024-01_medThe position of the fixtures was well planned in this remodeled second story. Painting the walls and ceiling the same color takes the focus off the shape of the roofline.The position of the fixtures was well planned in this remodeled second story. Painting the walls and ceiling the same color takes the focus off the shape of the roofline. Photo by: Alan Geller Bathrooms are probably the most complex rooms in the house. They have a network of plumbing and electrical lines, so typically the more extensive the changes in layout, the higher the project’s cost will be. It may not seem like a big deal to move a toilet a couple of feet one way or the other, but relocating waste and vent lines is difficult and time consuming. Depending on how your house was originally built and where the bathroom is located, it may not be practical at all. Moving sink and shower drains is less daunting, but the job can still be difficult. The bottom line: If spending is a major concern, you’re better off working with an existing plumbing and wiring layout.

Another consideration is whether you’re willing to move a wall to gain more room. If there’s an adjacent closet or bedroom that doesn’t get much use, borrowing a few feet by relocating a non-bearing wall may mean a big payoff. In a house with a cramped second floor it may be possible to create a larger bathroom by adding a dormer.

Finally, you’ll have to consider whether to gut the room or simply patch the walls, floors, and ceiling. In general, you’re almost always better off tearing out and starting new. It will give your builder a chance to correct hidden problems and often makes the job go faster.

Creating a Layout

gi028-01_medThis small bathroom is simple in style and decoration but the artful light fixtures and medicine chest bring the eye to the ceiling, visually enlarging the space.This small bathroom is simple in style and decoration but the artful light fixtures and medicine chest bring the eye to the ceiling, visually enlarging the space.

Bathrooms don’t have to be any particular size or shape to be successful. Part of the layout will hinge on how much room you have to work with, and part will depend on the plumbing fixtures and other room features you’ve identified as “must haves.” For example, if a large whirlpool tub is at the top of your priority list, the rest of the layout should be planned around this major fixture.

A key part of design is the relationship of various room features to each other: the distance from a toilet to an adjacent wall, for example, or the clearance between a toilet and tub. These planning guidelines can be expressed as either minimums that meet the local building code or as design recommendations, which are usually a bit more generous. Both numbers are important for planning. A bathroom designed for someone with physical limitations has its own set of guidelines.

Basics of Good Design

Every family’s needs and every house are a little different, so rather than simply copying a floor plan you’ve seen elsewhere and hoping it will work in your house, make use of design fundamentals to help you develop a floor plan that works for you.

These elements were developed by architect David Edrington, who credits A Pattern Language by Christopher Alexander for many of the original ideas. • Avoid layouts with more than one access door.

Create an entrance alcove for a bathroom off a hallway to provide an added measure of privacy.

A well-shaped bathroom is in the shape of a square or a rectangle whose length is not more than twice its width.

Good bathrooms have a clear central area where you can wash or dry off, with fixtures like the tub and toilet located in alcoves around the edges of the room.

Natural light is important. If the room can have only one window, locate it so it illuminates what you see when you first enter the room.

Use the “intimacy gradient” in designing a floor plan by locating the most private parts of the bathroom farthest from the door.

Bathroom-Layouts-gi029-01_med Bathroom-Layouts-gi029-02_med

Scott Gibson is a freelance writer and contributing editor to Fine Homebuilding magazine. He lives in Maine. Drawings by: Christine Erikson 

Dream Brewster Bathroom Remodel 

Coming up later this summer, our team will transform a rabbit warren of a bathroom in Brewster into a stunning spa like retreat.  This bathroom remodel will be a total transformation featuring a curb-less shower, tile and fixtures from Italy throughout.  We'll install a heated floor, a complete custom shower configuration as well as a floating mahogany counter topped by vessel sinks and wall mounted faucets.  This will be an exciting project that will be documented from start to finish.  Be sure to check back for updates on our blog.

Creating A Fabulous New Bathroom In North Falmouth!

May 2012 Finds the team from @designREMODEL working on a new bathroom project in North Falmouth. We just completed a kitchen remodel in West Falmouth and we just updated a deck for a long time client also in North Falmouth.

Located across the street from North Falmouth Elementary school, the owners of this Cape house enjoy a transformative first floor bathroom makeover that we completed back in 2009. In the interim we completed other projects as well.  In fact, one day this pass winter, I was driving by the house and noticed that the homeowners had some new landscaping done. I sent an email to them complementing them on the work and I got an immediate response:  "John, I was just thinking that I needed to contact you this week about getting our second floor bathroom remodeled and there you are in my email box!"

As my clients were very happy with the quality and durability of the fixtures, fittings and finishes in the first bathroom we had remodeled. Because of this, it was a fairly short, yet complete decision process on how the 2nd bathroom was going to be transformed.

Day 1. We completely gutted the entire bathroom down to the wall studs.

Day 2. Taking out the cast iron tub was no easy task. Fortunately it was a straight shot down the stairs and into the demo trailer! We had taken up the top layer of flooring and this allowed us to re-secure the sub floor with screws. We then put down a new lay of 3/4" plywood with lots more screws.  We had a number of squeaks, but Bob really made sure he eliminated them! A new wet wall at the end of the tub was built. At this time, we also removed the old window and shifted the framing over about 2' as it was too close to the new tub location.  Quirky side note. In opening up the wall, we found that old window framing that had been closed up in the past and thus this was most likely the 3rd time, the window had been relocated in the history of the house!

Day 3. Completed the install of a new Andersen window, then installed new exterior sidewall. Moving inside, we continued to set up for the plumber.

Day 4. The plumbers arrive and quickly set about their work. First, they demolished the old heat and rerouted the heat line under the floor. (This bathroom will have new in-floor radiant heat.) Then they removed and relocated the vent, waste and water lines as the tub and vanity, have switched locations.  At the end of the day, we set the new tub into a supporting bed of structural mortar.

Ball_Bath_2012

Day 5. Around the new tub, we installed blocking for balance bars and padded the walls as needed to allow the cement board to slide down past the tile flange on the tub. Adjustments were made in some of the framing else where in the bathroom and we also installed hurricane clips on the exposed rafters. We also installed a new fan/light fixture over the tub and then went up on the roof to remove shingles and install the fan exhaust port. While up on the roof, we also fixed a leaking, improperly installed pipe flange at the same time.

Day 6. The electrician arrives and removes all of the old wiring in preparation for a completely new rough including new home runs back to the service panel.  We had made his job easier by leaving out a section of the flooring and exposing the top of the wall on the wall below. This allowed him to fish new wires or home runs back to the service panel in the basement much faster and easier. This rough-in takes well over 8 hours to complete.

Day 7-8. Plumbing and electrical inspections conducted by the town of Falmouth are completed and passed.

Day 9. We install the newly upgraded insulation as mandated by code in the exterior wall and ceiling.Eladio Gore, Falmouth's Building Commissioner, stops by to sign off on the framing and insulation inspections. After his visit, cement board is installed around the tub and the final prep before the wall board is installed is completed.

Day 10. New plaster board is installed on the walls and ceiling.

Day 11. Plaster is skim coated onto all walls and ceilings and allowed to set.

Warmly Yours floor heat installed. Now dry fitting Ditra. (Orange layer) on top

Day 12. Next up is the installation of the in-floor radiant heat. We use a product from Warmly Yours, which makes a heat element woven into  mesh. Installation requires you to take your time to plan and then properly install while avoiding damage to the product.

Day 13. Our tile setter John, trowels a layer of thinset over the newly installed heat mat and will allow it set up before returning the next day.

Day 14. Over the thinset and in-floor heat, John now installs a product called Ditra. This is an isolation membrane that is secured with thinset. Ditra provides significant support for the tile while allowing movement by the substrate, thus avoiding grout popping or tile cracking.

Day 15. After setting the tile, John returns one more time to float grout into the joints of his tile install. When mixing the grout, he adds a product called Grout Boost which improves the stain resistance of the grout making it easy to keep the grout clean.

Days 16-20. We are in the home stretch! We start the week by installing a new cherry vanity and linen storage. We also install wall cabinets over the toilet. Then we trim out the window, door and install new baseboard scribed to the tile floor. On the vanity, we install a nice one piece Swanstone counter that has a integrated sink and backsplash.

Around the tub, we install the Swanstone surround on the walls and ceiling. Into the surround, we also install a large storage alcove and balance bars for safety.

Our painter Kemp, from Panda Painting works his magic by prepping, priming and painting the walls and ceiling. He then also stains all of the woodwork and after filling all of the nail holes, applies multiple layers of polyurethane to complete his work.

Meanwhile the plumber Al, has returned to set the toilet, connect all of the waste and water lines, install the vanity faucet and drain, then complete the tub/shower trim.

Right behind Al comes Richard, AKA Sparky, who wraps up the floor heat install by connecting and installing the digital control pad. He then completes the trim out of the recessed lights and installs the sconces over the sink.

Finally, (Are you going whew! yet?)  We drill and install the knobs at the vanity, change out the hinges and door knob to the bathroom with all new shiny chrome hardware. (Cape Cod salt air is tough on hardware) Install a new wood threshold at the bathroom entrance.

We also install the Ark Shower panel at the tub. Then our final touch is to do a complete clean up working our way out of the house.

Then we turn the bathroom back over to our clients Lary & Sue Ball who comment, "You've absolutely delighted us once again!" 

The following week, we are visited by the town's inspectors who pass the work of our talented trades.

Below are some iPhone pictures of the final result.

Ball1

Ball-1

Ball2

Ball3


10+ Insider Tips For A Better Bathroom Remodel

10+ Tips To Make Your Bathroom Even Better.

1. Make sure there is adequate support under your new floor tile.  Typically 1.5" is sufficient.

2. Have blocking installed in tub or shower walls for later installation of balance bars.

3. Install a simple timer on your exhaust fan and run it for 20 minutes after showering.

4. If you have stained wood in your bathroom, finish it with a polyurethane to block mildew growth.

5. Do not use a flat paint in a bathroom. Use a washable paint.  Most paint brands have bath or kitchen specific paint.

6. Consider a second mirrored recessed medicine cabinet in addition to the one over the sink.  This can be installed on another wall else where in the bathroom. You can specify an extra deep model for more room and can even order them with built-in electrical supply.

7. Roll out metal baskets in a vanity may provide more storage for less money then drawers.

8. Curved shower rods with a hook-less liner provides more elbow room and you can quickly remover the liner for washing when needed.

9. Hinged spray panels keep water in while providing ease of access to the tub.

10. If your toilet sweats, specify an insulated tank on your new toilet.

+.  Invest your money to remodel your bathroom once. With the right materials and built for longevity, you will enjoy your new bathroom worry free for many years!

Top 5+ Bathroom Remodeling Requests On Cape Cod

We remodel a lot of bathrooms here on Cape Cod and that provides us some insight in to what homeowners want when they remodel. Below are the top 5+ requests from Cape Cod homeowners who are looking to improve their bathrooms.

bathroom31. Bead Board Wainscot: This is a timeless look that when done right lends an air of elegance to a bathing space. Notice the emphasize on done right? I've seen far too many bathrooms with cheap bead board paneling from the big box stores slapped up on the walls and finished with a flimsy molding. To be blunt, it's cheap to install...and looks it. We use a product made by Nantucket Beadboard for our wainscot. (At some point in the future, I will put up a post about installing and finishing beadboard.)

2. Pocket Doors: I personally love pocket doors. In my dream home paid for by the shares I own in Facebook*, I would make just about every door into a room a pocket door topped by a transom window. (To do this requires 10' ceilings.) I really like how you can slide a door out of sight, as it makes a room seem larger and more open especially in a bathroom that is tight for space. Some people don't like pocket doors as they have had problems with them and I cannot blame them, as I have seen some atrocious installs over the years. And yet, pocket doors can be be trouble free if done right. The secret is patience and taking the time to plumb and level the door at installation and using ALL of the hardware supplied by the frame manufacturer.

Cost: Professionally installed beadboard, capped with trim and baseboard  will add $1200-$1500 to a typical bathroom remodel. (Finish painting is not included in the above figure.) 

* I don't own any shares in Facebook. Although I wish I did!

3. Tall Everything: The days of stooping over and brushing your teeth at a 24" high sink are over. Just about every vanity we have installed in the last few years, finishes between 34" and 36" in height. Much more comfortable for many users. Toilets are also available in what is now known as comfort height. (AKA. chair height.) We also install shower controls and shower heads at a tall height for ease of use. One thing I usually do at the planning stage is to ask my clients to share with me, what heights would be comfortable for them. This small request can make a big difference when they start using their newly remodeled bathroom.

Cost: Upgrading to tall everything usually costs 15% or more over standard height items.

4. Tubs into Showers: Many of our projects involve converting a tub into a showering space. This is an increasing trend as many homeowners are electing to stay put and make their house on Cape Cod, a "Forever home." In doing so, many homeowners are looking at how to create one level living by having all of the main rooms on the same level. (Usually the first floor.) Often times, we replace the 5' foot tub with a step in shower of the same length and width thus creating an easily accessible, safer and spacious showering space.

Note. Converting a tub to a shower on the 2nd floor is rare because the Massachusetts building code requires upgrading the existing 1-1/2" drain line to 2" drain line for a new shower install. This often requires opening up a significant portion of the floor to locate and tie into the main drain. Thus can be pricey.

Cost:Professionally installed tub to shower replacement including new controls, shower head, etc. and repairing the walls around the unit, usually start at about $3100. (First floor only.)

5. Tile and Glass: Along with converting the tub to a shower, we're seeing more tile shower surrounds and clear frameless glass doors. The tile will often have a decorative element and many projects will have the tile all the way up to the ceiling as well as on the ceiling. One suggestion we make, is to have a solid surface or cast iron base rather then tile for a cleaner look and to provide for easier cleaning. The glass doors which can be bypass or swinging doors allow you to see the tile work and adds a rich elegance to the bathroom. We often specify the 3/8" or 1/2" thick glass, especially for the bypass doors as the thinner glass rattles when you slide it from side to side.

Cost:Professionally installed shower surrounds with tile and glass. Usually the most expensive part of any bathroom remodel. $8,000 and up.

+. Laundry Center: We have had quite a few bathroom remodels that istackable-washer-dryernvolve taking a space within the bathroom or from an adjacent room or closet and converting it to a Laundry Center. Because of space constraints. Most of them require the use of a stacked washer/dryer instead of a conventional side by side washer/dryer. Creating this space, added significantly to the cost of the bathroom remodel and yet, every client we have done it for, has said it was well worth it! Cost:Hard to pin down as many factors involved. $1800 for a basic relocation to $4500+ for a complex install. Does not include stacked unit which can run $1200 to $4500.

There you have it, the top five+ requests for features in a bathroom remodel from your fellow Cape Cod homeowners. It's my experience that any bathroom that has any or all of the features above makes the overall project far more worthwhile!

If you have any questions about the projects noted above, send me an email to JSC@AtDesignREMODEL.com

Sitting In The Shower

9926Sometimes after a long day of chasing the clock, it's heaven sent to be able to escape to a long hot shower while having some ME time. Yet in most showers, it's standing room only. Have you ever wished you could take a seat while showering? Just to be able to sit back and let the hot water stream over you? Unfortunately the size and design of some shower stalls will not allow for any kind of seat. If your shower is at least 34 x 34 in size, you maybe in luck. Before purchasing any kind of seat, be sure to measure your space to see if it will fit while someone is using the shower.

We've installed a number of fold up seats like the ones shown to the upper right. There are some advantages from using a fold up seat over a fixed or built-in seat. Fold up seats take up less room, are less expensive to install vs. constructing a fixed or built in seat. Plus the wood seat is warmer to sit on then tile or stone.

One thing to keep in mind is that good structural support or blocking needs to be in place behind the shower prior to installing any kind of folding seat. It may be possible to install the blocking behind the shower from an adjacent room. Consult your local remodeling professional to see if this is feasible.

I recently discovered in one of my professional trade magazines, the Serena Seat which is pictured to the right. It's clean look and ease of use had an immediate appeal. It's easy to install on a properly prepared shower wall and has a back rest to lean against. When folded up it only has a 3-inch profile. It also has a precision tension hinge which prevents the seat from accidentally falling down. The wood is brazilian walnut which is up to 3 times stronger then teak.

Fixing a Remuddle: A Bathroom Remodel In Sandwich MA

We just wrapped up a bathroom remodel in Sandwich. This was interesting as we were undoing the previous remuddle which the homeowners absolutely disliked. This tiny bathroom had a massive 6' whirlpool tub that drained the hot water heater when it was only half full. The size of the tub also led to knocking knees every time someone used the toilet! Danger! Floor Collapse Ahead...! Interestingly enough, when we demolished the bathroom interior, we found baby blue chips from the cast iron tub that had previously been occupied by the whirlpool tub. This tub also took up precious closet space. During the demo work, we found floor joists that had been mindlessly hacked apart thus weakening the floor structure. The substrate behind the previous tub/shower surround was awful as it was simply a mix of sheetrock and cement board with no water-proofing at all!

New Archer Tub From Kohler We installed a new Kohler Archer tub in the original location and rebuilt the closet. This closet rebuild provided the homeowners with much needed storage space. Around the tub and on the ceiling, we installed Durarock cement board followed by a roll on waterproofing membrane. Making for a water tight tub/shower space.

The homeowners selected 8x8 gloss white tiles complimented by a narrow row of glass tile. This tile was placed around the tub as well as on the ceiling. On the floor, we installed a Ditra isolation membrane followed by a 12 x12 floor tile. This was finished by a curved shower rod. This shower rod created more room in the tub/shower when needed.

Snakes N' Sparks! The electrical work was a bit of a snakes nest as the electrician had to eliminate the illegally buried junction boxes and untangle the mess left behind. The switches for the bathroom were moved back into the bathroom where they belonged. Time was also taken, to relocate the plug at the sink at a taller height so that it was no longer practically sitting on the countertop. We also installed a Panasonic fan/light combo that is whisper quite. This replaced the F15 engine that was mounted in the ceiling.

Fast N' Furious This remodeled remuddle was completed in less then 15 working days and provided the happy homeowners in Sandwich, with a new bathroom that was roomier and far more functional.

Happy Homeowner The homeowner posted the following review on Angie's List..

john_quoteWe are very happy we chose the right person to remodel our bathroom. John impressed us in many ways. He was very thorough. He kept the worksite and our house clean. He was always upbeat. The fact he likes his work shined through. We also liked the fact that he did much of the work himself. The workers he did bring in shared his work ethic; they were all excellent. Many contractors do an "OK" job, John and his team did an excellent job.


Bathroom Update- A Clear Idea...

ShowerScreen Have you ever stepped out of your tub/shower to find that your bathroom floor is soaking wet because you forgot to pull back tight to the wall, the end of a shower curtain?

Does it bother you when you are trying to clean out the tracks of bypass glass doors or finding that the doors and tracks get in the way when taking a bath or when you have kids in the tub?

Several years ago, I discovered a solution for the above problems while remodeling a small bathroom for my family when we were living in Cataumet. During the remodel, I had installed a deep tub that was doubling as a shower and I had decided that I did not want a shower curtain or liner as they are called elsewhere. And installing bypass doors seemed too confining, even with frameless doors.

This solution I discovered is called a shower screen. Simply put, it is a glass panel about half the width of the tub length that is hinged to the same wall as the water controls. This is an elegant solution that will keep water in the shower while allowing access to the the tub. It also has the added benefit of making a smaller space seem larger.

One thing to keep in mind is that you will need to allow room for the screen to swing out, which can be a challenge in bathrooms where the toilet is located right next to the tub. It maybe worth relocating the water control/spouts to the opposite end of the tub/shower allowing for better access.

If you would like to find out more about shower screens, visit our online supplier ArkShowers.com

We can also help you determine if this is a good solution for your bathroom.

Photo Credit. ArkShowers.com

Thumbtack- Finding a Trusted Service Provider

While perusing the web the other day, I came across a very sharp and well styled website called Thumbtack. This site was set up to allow anyone to search for service providers. What I liked beyond the look and feel was the ability to add my own content as well as a link back to my own website. Click on Bath & Kitchen Bath & Kitchen Remodeling to see my listing in action. I think with it's clean look and ease of use, Thumbtack will give some of the other listing services a run for their money!

Ten Tips For A Better Bathroom

Everyone loves a good top ten list! Read on and enjoy our “Must Do” for bathroom remodeling, Pocket Door 1. Install a Pocket Door. Most bathrooms are so small that doors can sometimes make them even smaller. Converting the swing door into a pocket door always opens up the space visually as well as physically. Warning: Pocket doors should always be installed by a professional as the installation often involves dealing with structural components of your home.

2. Venting? Always, always, always ensure your bathroom is properly vented. Many homes lack venting in the bathroom, resulting in black spoor-like stuff growing from the ceiling. Also many homes have undersized fans that often sound like an F15 on a takeoff roll. When it comes to venting, our favorite is a remote fan with light. The fan motor is installed in a location away from the bathroom many times in the attic, which reduces significantly the noise you will hear when the fan is on. This style of fan will have a 6″ grill in the ceiling which in the center, has a small halogen light that you control with a dimmer. The actual fan is controlled by a timer with push button presets ranging from 10 minutes to 60 minutes.

3. Comfort Height Toilets are just so much better! Comfort height or chair height toilets are much more comfortable for users. They are about 2″ taller then the old standard. If you have young children, you may want to have one toilet in your home that is at the lower height.

Beadboard 4. Painted Beadboard lends an elegance and look to a bathroom that is classic and clean. For a long time, I did not like beadboard in a bathroom. Why? Because beadboard usually consisted of 1×6 pine milled with a tongue and grove and beaded on the edges and center. As the beadboard was wood, it was subject to moisture changes. The nice tight paint job looked great until the heating season when the beadboard shrank and showed cracking in the paint. The beadboard would look awful until the humidity of summer rolled around.

Enter stage right, a product made by Nantucket Beadboard Company Beadboard.com in the form of 4′ x 8′ and larger sheets of bead-board. Manufactured from premium medium density fiberboard, the sheet beadboard is much more dimensionally stable and less prone to movement. ie a tighter paint job. We also like it because it installs much faster then the piece by piece method of wood strips. If you want to install the beadboard in your bathroom, make sure you purchase the moisture resistant grade rather then the standard grade.

5. Heated Floors. Quick Quiz. Can you name the healthiest, safest kind of heating system? If you said radiant heat, give yourself an A! Yes, we’re big fans of radiant heat, especially in the bathroom. Nothing beats stepping out of a shower onto heated tile on a cold winters morning. Our preferred brand of radiant heat is Warmly Yours. They have a system that is well thought-out and easy to install. The running costs of radiant are minimal for a small area such as a bathroom. AD ALERT: With every complete bathroom remodel, we will supply and install at no charge a complete underfloor heating system!(10/11 This promotion has expired.) Call or email for more information. To find out more about radiant heating visit WarmlyYours.com

6. Handheld Shower. One feature we suggest to clients who are upgrading, is to include a handheld shower in addition to the standard shower head. Handhelds are more flexible then a fixed shower head and allow you to do everything from bathing the dog to cleaning the tub or shower, as you can put water where you need it.Very Important: Be sure to install a handheld shower system that has a wall mounter diverter. We have found the diverter that is mounted into the fixed shower head, is either too hard to use or too high. One system we often install is made here in America by Symmons. (Symmons.Com)

Crown_Point_Vanity7. Taller Vanities. Like the toilets we mentioned above, vanities have grown up which is a godsend to those who spent many a time stooped over at sinks designed for the vertically challenged! The taller height is more comfortable to use. Don’t forget however, to have a stepstool handy for the little un’s.

8. Flow in Sink. Is a type of sink you can have with a solid surface product such as Corian or Swanstone. The countertop material flows into the bottom of the sink creating a seamless bowl making for easy cleaning.

9. Hooks. Sometimes towel bars can be just too fussy and formal. Big hooks to hang towels allow you to hang and run and you have more hanging space. Some we have used, can be found at RestorationHardware.com Be sure to use the large ones to allow towels to hang freely so they may dry.

10. Creative Storage. One example is recessing mirrored cabinets in locations other then over the sink. Another is creating a space for a 20″ wide and 24″ deep linen cabinet when we have removed a 60″ tub and replaced it with a 36″ shower. One trick we have done in the past, is to recess a cabinet into closet of an adjacent room keeping the face frame of the cabinet flush with the bathroom wall.

Secrets of a Well Crafted Bathroom or Kitchen

Communication.Listening and understanding your needs.

Accountability. You work with the same person start to finish.

Resources. To build your project.

Experience. Knowing and understanding the big picture.

Note above that the first letter of each sentence when you look down spells the word "CARE" and that is a good place to start when considering someone to work on your home.

Do they care about you? or they simply see you as another job to "Bang Out" and move on. Do they care about how the project will affect you while it's taking place? Do they care about how your project is built? About the best way to do things?

Let's take a look at the above and really, they are a way of doing business rather then "secrets".

Communication
Of all the things that can go wrong on a project, lack of communication- both ways can really have a detrimental impact on a project. A well versed contractor will keep you in the loop even when there is a problem. Folks get annoyed when they are constantly having to ask "What's going on with my project?"

Communication is not just been reachable by phone or email. It's have a start and finish date for the project, it's having a clear readable contract. Having specifications for the project. It's telling the client regularly about what's happening and what's going to happen next. Yes, it takes work to do this, however it makes for a smooth project that glides over the bumps that will occur.

Accountability
Simply put, clients should be able to know who to go to and have assurance that things will be taken care of when there is a problem.

Resources

It's not just about having bodies to do the work. Rather its about having trade partners who have a depth of experience to tackle just about any project. It's also about working together as a team and thinking ahead for the next craftsman so that his job is made a little bit easier. Having the right tools will also go along way towards building a better project efficiently.

Experience
With today's increasing specialization, it's rare to find a contractor or craftsman who has worked across the trades and has built a project from foundation to finish. It's critical to have someone who can step back and understand the big picture. From knowing how to control moisture in a home to building bathrooms with universal access. Being able to identify potential problems in a kitchen before anything is built. Working for years in whole house remodeling has provided me with the ability to see and understand the big picture.

In selecting a contractor, builder or craftsman, see if they CARE.

How do they communicate? Where does the buck stop if there is a problem? What resources do they have to ensure the project is completed right and in a timely manner. What big picture experience do they have?